Register a new employee
This applies to companies that have enabled onboarding and offboarding in the control panel. It can be enabled on request: see Onboarding and offboarding in the control panel.
Click New employee on the Employees page, or New request and choose New employee. The wizard takes you through the steps below, with Next and Back at the bottom. Steps that do not apply to your company are skipped, for example Mailing lists when no lists have been set up for you.
The wizard saves automatically as soon as you have entered the name. You can leave it and continue later from Not sent on the Employees page.
1. Who
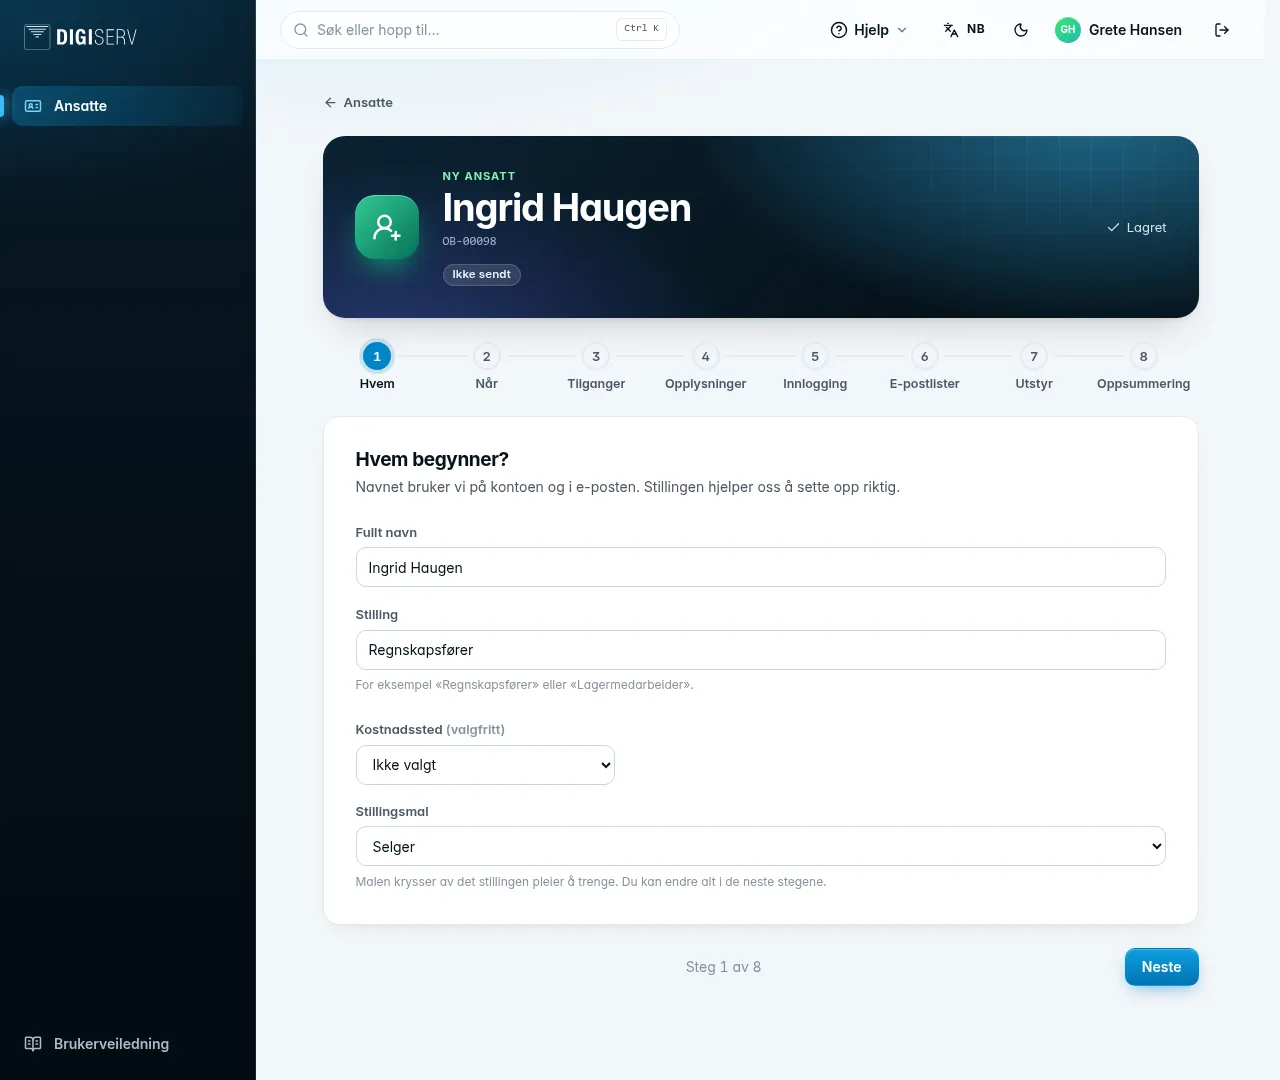
Enter the full name and job title. We use the name for the account and the email, and the job title helps us set things up correctly. If your company has several companies in the group or several cost centers, you choose that here too.
If you have role templates, choose one under Role template. The template ticks what the role usually needs in the next steps, and you can change everything. If you have already made your own choices, the wizard asks before the template replaces them. Details you have entered are kept. See Role templates.
Is this the same person?
If the name already exists among your employees, including those who have left, the wizard asks Is this the same person?:
- Yes, the same person links the request to someone who has left, so we use the same person. If the person is still here, the wizard goes to Change access instead.
- No, a different person means you will not get the question again. We can see in the request that it is a new person.
If someone who has left is starting again, you can also click Coming back next to the person under People. The email address does not carry over. We sort that out when we pick up the request.
2. When
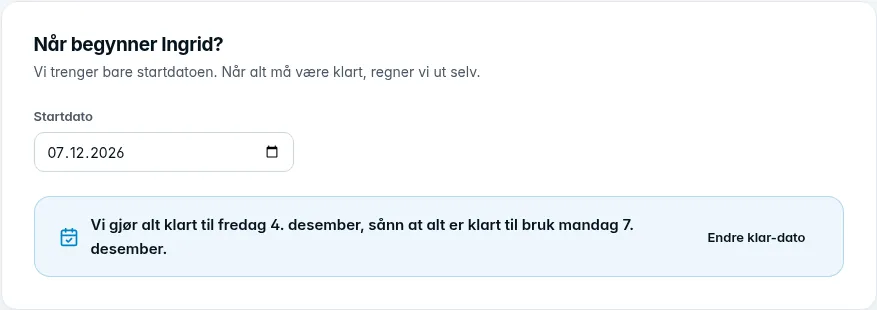
We only need the start date. We work out the ready-by date ourselves: the last working day before the start. Weekends and public holidays are not working days. The date appears in the sentence We will have everything ready by …, so everything is ready to use on …. Click Change ready-by date to choose a different date, and Use the last working day before the start to go back to the one we calculated.
- If the date is close, you get a Short notice warning. We do our best, and you can still send the request.
- If the start date has passed, that is fine too. We will then get everything ready as soon as we have picked up the request.
- If the person is a temp or on a fixed-term contract, tick Temporary (temp, fixed-term) and choose Last day. The date is then shown on the person in the list, and you report the departure when it approaches.
3. Access
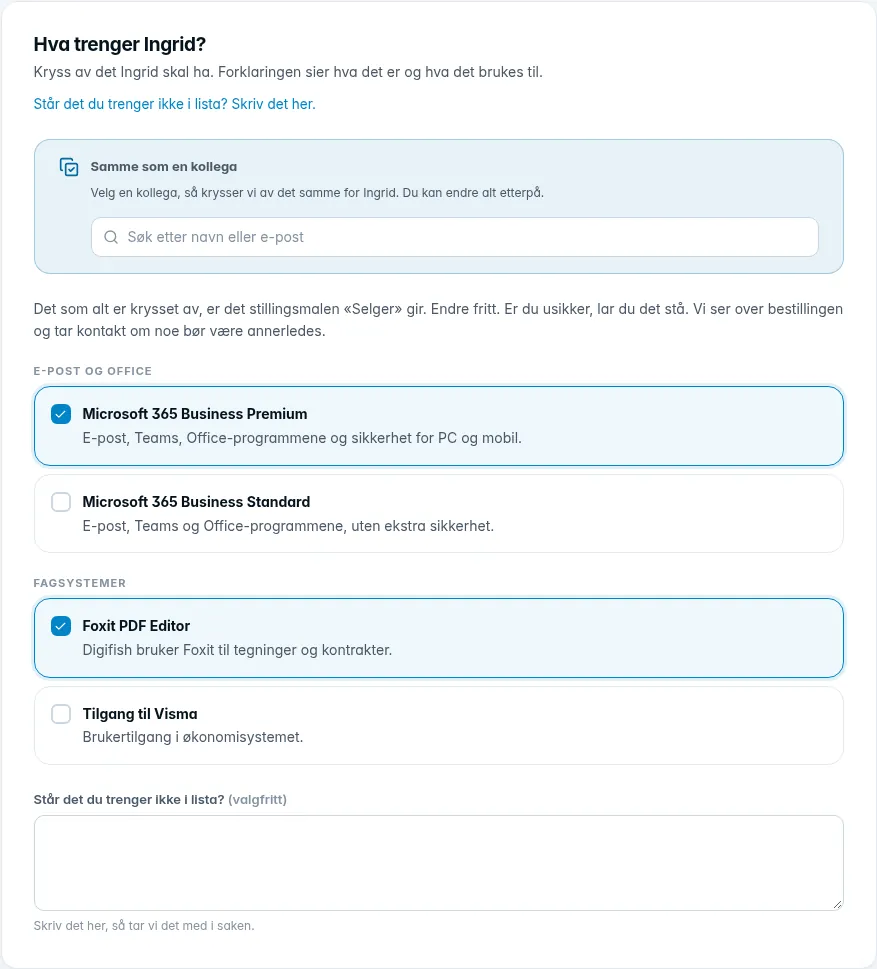
Tick what the new employee should have, for example a Microsoft 365 license and access to business systems. Each option has a short explanation of what it is and what it is used for, and longer explanations open with Read more. If you are unsure, leave it. We review the order and get in touch if anything should be different. Equipment is chosen in a separate step.
Same as a colleague: choose a colleague, and we tick the same things. The card shows what the colleague has, marked Ticked, Not ticked or Digiserv reviews this. It replaces what you have chosen yourself, and the wizard asks first. Job title and cost center do not carry over. Equipment and mailing lists not registered to the colleague are yours to choose in the next steps. If nothing is registered to the colleague, we check it and give the new employee the same.
Is what you need not in the list? Write it in the field at the bottom, and we will include it in the request. The link at the top of the step takes you straight there.
4. Details
Some options require information from you, for example a preferred username. The wizard only asks for what the options need, grouped by service, with a line about what the information is needed for. Under Other details is what your company asks for from all new employees. Fields marked (optional) can be left blank. If none of the options in a list fits, choose Other, please explain at the bottom and write what is needed in the field that appears. If none of the options needs anything, the step is skipped.
5. Sign-in
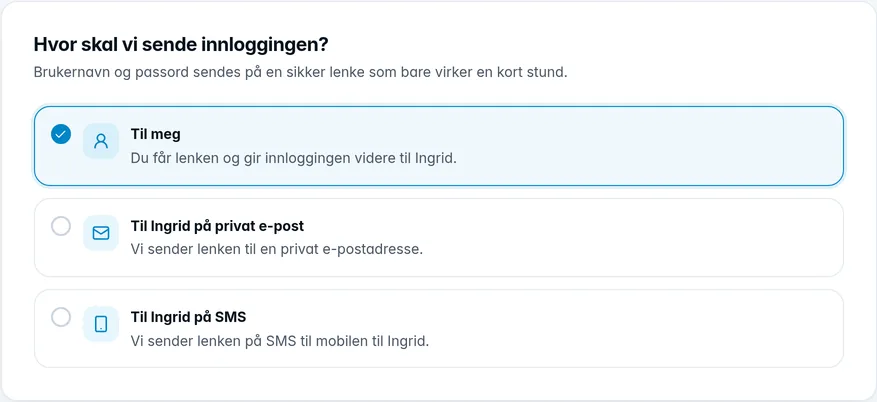
Choose where we should send the username and password:
- To me: you get the link and pass the sign-in details on to the new employee.
- To [name] by private email: we send the link to a private email address you enter.
- To [name] by text message: we send the link by text message to the mobile number you enter, with country code, for example +47 912 34 567.
The private address and the mobile number are only used to send the sign-in details. The username and password are never in the email or text message itself, only a secure link that expires after a short time and can only be opened a few times. Keep the details somewhere safe once you have opened it. If you get the link yourself, pass the details on securely, not in an ordinary email.
6. Mailing lists
Tick the lists and groups the new employee should be in. The step only appears when lists have been set up for your company.
7. Equipment
Tick the equipment the new employee needs, for example a laptop, and choose New, Taken over from a colleague, Digiserv has one in stock or You already have one. We confirm in the request whether something you or we already have is suitable.
If the equipment is taken over from a colleague, you choose who. If the colleague already has an open leaving request, we link the requests. Otherwise the wizard asks whether the colleague is leaving at the same time, and whether the colleague needs a new PC. If you answer yes, you get a button on the confirmation once you have sent the request. It starts the offboarding of the colleague or an order for a new PC for the colleague, as a separate request.
8. Summary and sending
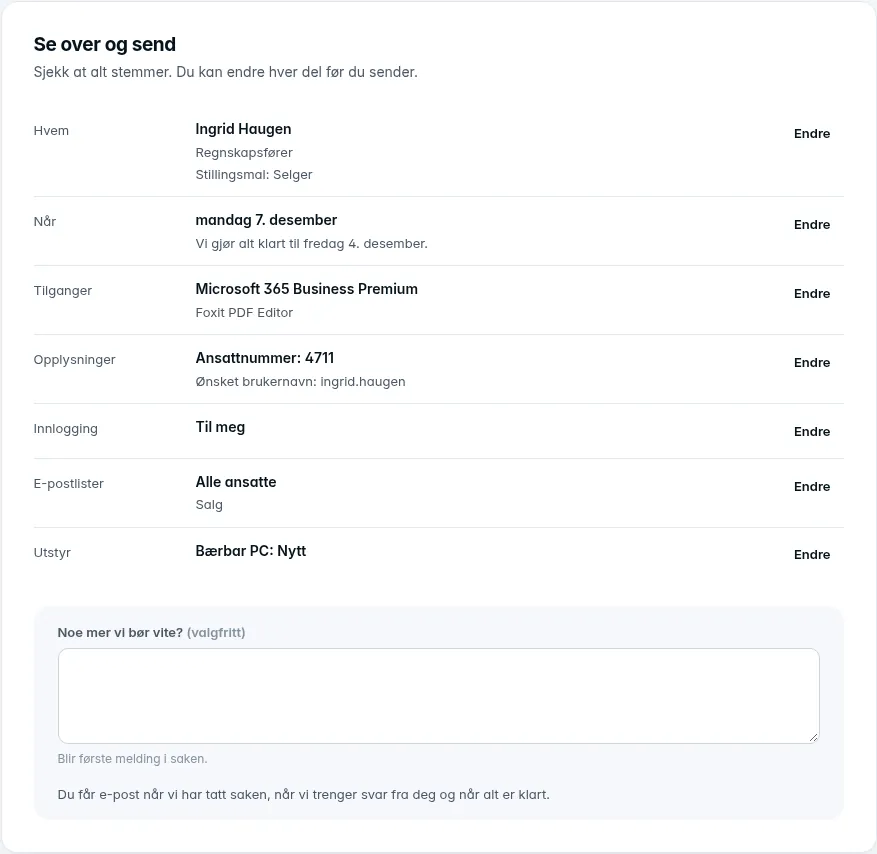
Check that everything is correct. Click Change next to a part to correct it, and Back to the summary to come straight back. If anything is missing, it is shown at the top with a link to the step.
- Anything else we should know? is optional. What you write becomes the first message in the request.
- Also send me a text message when something happens gives you text messages in addition to email. The option appears when you have a valid mobile number under Phone in My account, and the wizard remembers what you chose last time.
Click Send to Digiserv. You get the request number straight away, for example “Sent! Your request number is OB-00042”, and the date we are aiming for. You also get a confirmation by email.
What happens at Digiserv
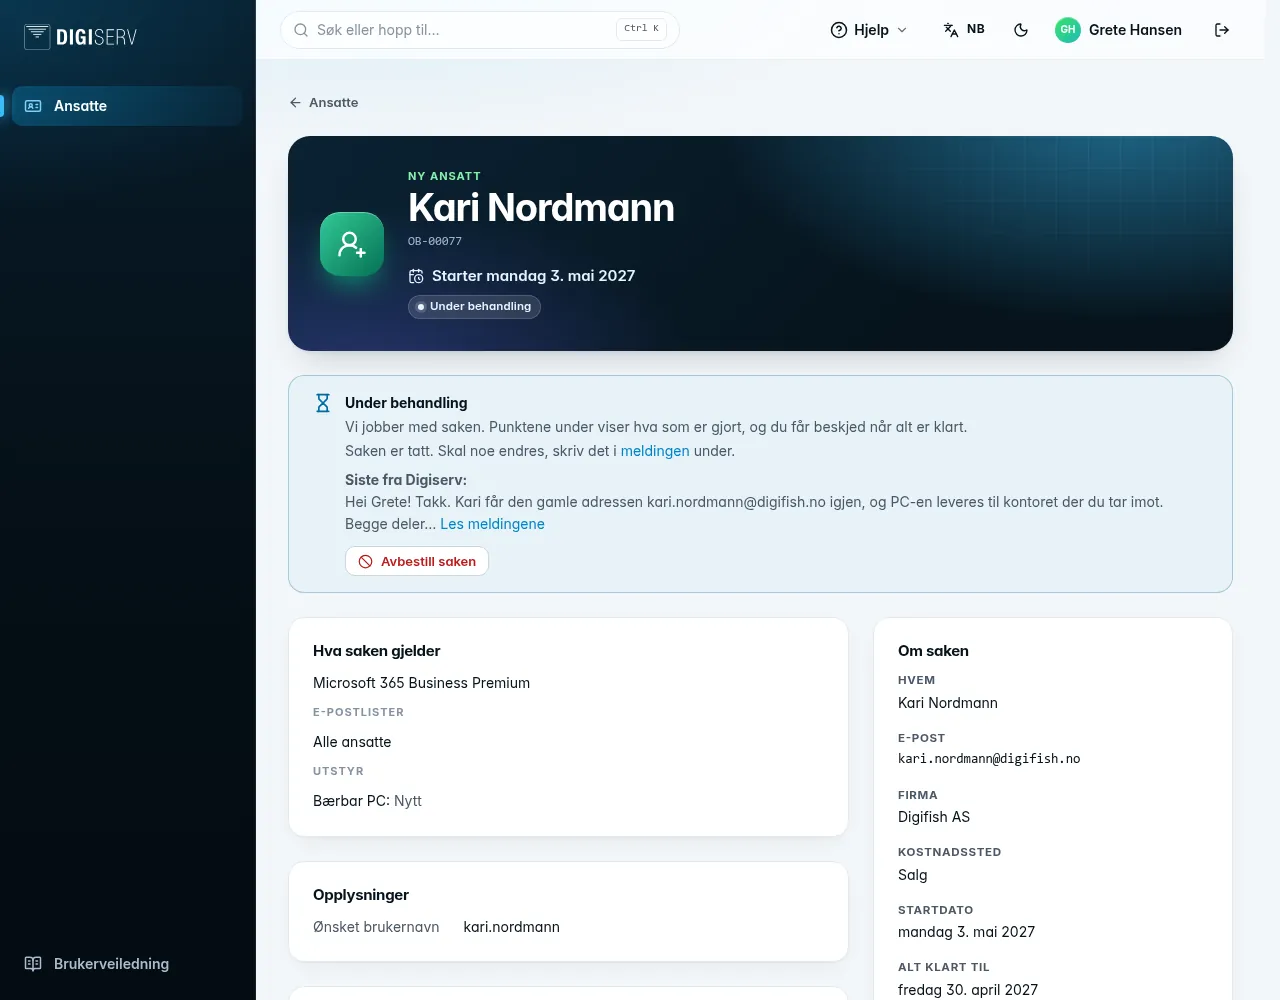
You find the request under Requests on the Employees page. It shows the status, what the request is about, the dates, the checklist, the messages and a history of what has happened.
- We pick up the request. The status changes to In progress, and you get an email about who is working on it and the date we are aiming for.
- The request gets a checklist of what needs to be done, for example each license, each mailing list, the equipment and sending the sign-in details. Items are ticked off as we complete them.
- If we need something from you, we ask a question in the request. The status changes to Waiting for you, and you get an email, plus a text message if you chose that. Click Answer in the request and write your answer, and we will carry on. If we do not hear back, we send a reminder.
- We send the sign-in details as a secure link to where you chose in the wizard.
- When everything is done, the status changes to Done, and you get an email with what we have done.
If you only have part of the answer, tick I do not have everything yet. Keep the question open. We then get what you wrote, and the request stays at Waiting for you.
Under Messages in the request, you can write to us at any time while the request is open, for example if something is unclear. You get an email when we write in the request. The emails go to you as the person who submitted it and to whoever last changed it.
Change or cancel the request
- As long as the request shows Sent, you can change it with Change in the request. The changes are only sent when you click Save changes, and we are told what has changed. You can also cancel the request with Cancel the request. This cannot be undone.
- Once we have picked up the request, write what should change in a message in the request. To cancel, click Cancel the request, write why and click Request cancellation. The request gets the Cancellation requested flag, and we let you know when we have made a decision. If we say no, the request continues, and you get our reply by email and in the request.
- If a cancelled request should go ahead after all, click Report again in the request. You then get a new draft with the same choices. You choose the dates again.